Technical Details

Machine Data:
High strength due to whole body casting with high quality material.
Smooth running, high pressure and low noise.
Adopted advanced MCU control technology has sensitive and reliable performances, easy operation.
Electrical equipment form completes a set, and major mechanical components with high quality equipment and materials.
Operational altitude is reasonably prearranged; moving-bed opens to its upper limit.
Electrical system is designed in compliance with IEC standard.
Trustworthy safety system.
We offer 1 year warranty for our RPD-850 model roll paper die punching and creasing machine.
Contents of Instruction Manual
- 1. Abstract
- 2. Main Technical Parameter
- 3. Technical Character
- 4. Power Unit
- 5. Main Structure and Function
- 6. Operation Instruction
- 7. Testing and Adjustment
- 8. Safe Working
- 9. Installation
- 10.Maintenance
- 11.Trouble Shooting
- 12.Important Information
1. Abstract
JT 850B is designed to meet with the market of modern paper industry , we see Machinery has independent intellectual property rights for this machine. JT 850B with the character of high speed and good quality, simple and compact structure, strict and accurate action , easy and safe operation, stable and reliable performance. Prepare the tooling and paper roll according to your demand and the machine will cut the roll paper directly into blanks, it reduces some working procedures, saves labor cost, enlarges the capacity and improves the utilization rate by more than 5%.
2. Main Technical Parameter
| Active Mould Punching Distance | | 30mm |
| Maximum width for paper rolls | | 850 mm |
| Blank counting alarm | | Every 1000 times |
| Maximum Punching Speed | | 235 times/min |
| Recommended Punching Speed | | 170 times/min |
| Maximum Paper Roll Diameter | | 1200 mm |
| Machine Size | | 2700mm*1300mm*1800mm |
| Net Weight | | 1500 Kgs |
3. Technical Character
3.1 JT 850B does not transmits the paper with guilding track like other kinds of punching machines, but with rotary guiding pillars.
3.2 T 850B punchs the blanks directly and automatically from paper roll, while the flat die cutting machine die cut the paper sheet and separate the blanks with leftover materials msnually.
3.3 JT-850B realizes the one step producing the base paper to blanks.
4. Power Units
Main Motor (Paper Cutting Motor): Y112M-6 P=2.2KW n=940rpm
Servo Motor ( Paper Sending motor): HC-SFS121(B) P=1.2KW
M=11.5Nm(Mmax=34.4Nm)
Paper preparing motor (with cycloidal reducer): 120-1100WB i.=11 no.p=127rpm
Magnetic Powder Brake: FZ100A-1 M=1.00Nm 24V 2A
5. Main Structure and Function
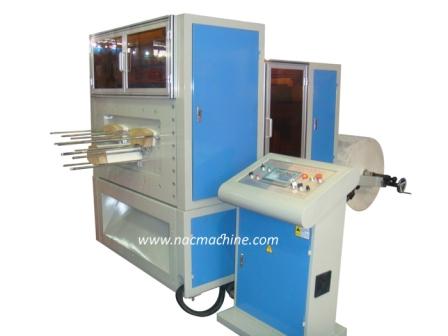
JT 850B is consist of A. Machine frame ,B. Cutting area, C. Mould, D. Paper preparing frame and E. Paper roll frame.
The power units generate power and transmit the paper from E. Paper roll frame, crossing D. Paper Preparing frame, to the B, Cutting area then the C. Mould punch the paper into blanks and push them out to 7. Guide rod, then the waste be cut and come out from 1. Waste paper exit.
6. Operation Instruction
6.1 Load Paper
Please confirm the following items before loading paper:
A. Is the paper roll regular or not? It must be trimmed at two sides. So please choose the good paper supplier.
B. Make sure the width of the paper roll is within the maximum width that the machine allowed
C. Confirm which side of the paper roll is the PE lamination side. Make sure that the outside is laminating side when the paper goes through the cutting mould.
While loading, please move the paper roll to the open end of paper roll frame E, and put paper roll axes 27 cross the middle hole of paper roll, expend the axes to make sure the paper roll can not go left or right, then carefully put the axes and paper roll onto the paper roll frame and lock it, notice that not to break the braring adjuster 32.
6.2 Guiding the paper cross the machine.
Firstly, open up all press rolls on the cutting area B and paper preparing frame D. The guide the paper cross the paper sending rolls and smooth rolls , go through the cutting mould to the paper waste exit. Then close the press rolls and tension control uint, and prepare to run the machine. Make sure that the paper is straight.
6.3 The blocks
The blocks are the wood and paper with the same shape of blanks, which should be put into the guide rod7 and near the inner edge of female mould before running the machine.
T he blocks can be made of paper blanks , wood or nylon, whichever is chosen, make sure the surface of the blocks smooth enough to avoid the strong resistance between blocks and guiding rods.
6.4 The console
There are start, stop and other buttons, along with PLC touch screen, on the surface of the console. Normally the data of the PLC has already been set and is not allowed to re-set it.
7 Testing and Adjustment
7.1 Rectify the camber of the paper roll.
The punched blanks must be flat. While the paper roll inevitably has camber. The outside paper layers is big enough, so the camber is not so obvious and easy to be rectified by the paper sending rolls and press rolls. But the inner layers are very small and the camber is too obvious that need the camber rectify unit 24 in paper preparing frame D to make the paper flat.
7.2 Paper Sending direction and position
Make sure that the direction and position is right to promise good quality blanks.
Pay attention to following three points:
7.2.1) Paper roll in the middle of the axes. Check the paper roll from back to front to see if paper roll is on the middle of the axes, if not, slowly turn the bearing adjuster 32 to the right position.
7.2.2) There are front guide plates 18 on the top left corner and right back of the paper sending roll 10 on part B. Adjust the width between guide plates according to the paper roll width. Every side should remain about 3 mm space. Then lock the guide plates tightly.
7.2.3) There are two reasons for paper roll goes wrong
Firstly, the pressure from press roll 11 onto paper sending roll 10 in part B is not in balance. Please adjust the tension spring 15 to fix it. When adjusting , please notice two things, one is do not make tension spring 15 too tight, otherwise it may broke the motors; the other is adjust a little pull each time, then watch the result and do another adjustment.
7.3 Paper Sending Length
The paper sending length has been fixed when designing the moulds, and has been set in the PLC. Normally we don’t recommend you to change the value, but you can do fine adjustment.
7.4 Punching Frequency
The punching frequency is the punching times in a certain period. Normally the punching frequency is fixed.
7.5 Counting and Alarm
The set counting alarm is punching every 1000 times, there will be noise and flash when alarming.
8. Safe Working
The main driving system and working postion are isolated from outside, and only few parts are exposed. It is very safe unless you touch the moulds or driving system when it is working.
9. Installation
9.1 Installation of the machine
No special base is necessary for installation of JT-850B. A flat and hard floor is good for installation of the machine. Avoid violent collisions during delivery. After the machine arrives at the installation site, let the legs support the machine,loose the locknuts of the legs, adjust the screws and use a gradienter to find a plane.
9.2 Installation of electrical box
The electrical box has been fixed before delivery, so only need to connect the plug to the power source and set earth wire. All the external wires must set in order to avoid daily operating or other kickback.
10. Maintenance
10.1 The work site of the machine must be kept clean and in order.
10.2 The machine must be kept clean . Clean the machine timely, do not let the oil stain touch the paper roll. Any part of the machine should have no dust or wastepaper.
10.3 Lubrication
Glyserin is used to lubricating the machine, all the lubricating spot be cleaned and lubricated timely.
10.3.1 Moulds
Clean the liner bearing on the moulds every month, and add new glycerine carefully.
10.3.2 The gemel 5 between mould C and transmit axes 4 has a oil mouth 45, lubricate it every half a month.
10.3.3 Bearing in the transmit axes 4
10.3.4 Lubricate the bearings at two sides of transmit axes 4 and other transmit bearings every year.
10.3.5 Lubricate the bearings at two sides of paper sending rolls according to the working situation.
10.3.6 Paper roll axes 27. Lubricate the bearing adjuster 32, gears and the bearings at two sides of paper roll axes 27 frequently.
10.4 Regular Inspection
Many parts of the machine suffer great impact force or in vibration, and some components may become flexible, displaced or destroyed, so professional maintenance personnel is needed to make regular inspection.
10.3.7 Check the fasteners, especially the fastening screws and screwed plugs on t he mould every month.
10.3.8 Check the screws on the joint between backup plate 6 and cutting area B ,the joint between cutting area B and machine frame A, the joint between paper preparing frame D and machine frame A every half a year.
10.3.9 Check other fasteners if they are loosen.
10.3.10 Check out whether the earth wire works well or not.
11. Trouble Shooting
11.1 Paper goes deviation
Reasons:
A. The friction force between twp paper sending rolls 10 is not equal.
B. The front guide plate 18, include the two back guide plates, is misplaced.
C. The paper roll on the paper roll axes is misplaced.
Solution:
Watch the machine running carefully , find the real and adjust the paper goes little by little.
11.2 Paper Jam in the mould
He falling paper, because the blan
Reasons:
A. The guide rod 7 is loosen.
B. Blocks are not suitable. (Not regular, too tight, unproper friction with the guide rod 7).
C. Not enough length for the male mould goes in to the female mould.
D. The blanks block the falling paper, because the blanks.
E. The waste paper exit guiding board 1 blocks the falling waste paper.
F. The falling paper and the waste paper exit guiding board 1 stick together because of the static electricity.
11.3 The upside or bottom of the blanks incomplete.
Reasons:
A. Paper feeding length is too short.
B. Paper feeding time is not proper.
Solutions:
Adjust the paper feeding length to the right value on the touch screen.
If above solution does not work, there are two iron rings at one end of Transmit axes 4. There is iron ring with one magnet on it and has a hall- effect switch accordingly, it is a standby Component. Another iron ring with two magnets on it and has a hall-effect switch accordingly, it is used for counting and paper sending. Now we have to adjust the position of two magnets to change the paper feeding time. Loosen the screw on the iron ring; adjust the position little by little it comes to the right position again.
11.4 One side of the blanks incomplete
Check the width of the paper roll, if it is ok then it is the problem of deviation. Please refer to item
7.2 And item 11.1 to find t e solution.
11.5 Blanks with burr
Reasons and Solutions:
A. Reserve side feed. The PE coated side should go outside.
B. Time to maintain. Maintain the mould when it is the time.
11.5 Paper reserve disorder in D area.
Normally the paper pulling out from between press roll and paper pulling roll is falling down naturally by gravity , it keeps a suitable reserve to feed the mould cutting. There are two photo- electric switchs to control the upper limit and lower limit of paper reserve.
Paper reserve disorder means the too much or too less reserve.
Reasons:
A. Photo – electric switch malfunction.
B. Punching speed too fast.
C. Magnetic powder brake malfunction.
Solutions:
Check and repare the photo-electric switchs and magnetic power brake, slow down the punching speed.
12. Important Information:
12.1 Shut down the machine immediately after hearing sound. Check out what is happening and do not run the machine unless solve the problem.
12.2 Do not use the transducer to adjust the running speed. It will bring bad result.